 |
 |
|
|
|
|
|
Creating a texture
I've been asked so many times, "how do you make a skin?"
but what they really want to know is 'how do you make your textures?'.
First off, if you're looking for a tutorial on how to use your image editor to make your textures, this isn't it.
Only by the sheer number of image editors out there, and the fact that I don't even use the most popular one, would make me a poor instructor. If you want to learn how to use your editor, work with it, or in the very least check to see if it has a tutorial, or do a search to see if there's a tutorial out there for it.
For those out there that have Micrografx's Picture Publisher I may be able to help you out with your more specific needs, but otherwise, I'm afraid you're on your own.
What I do have here though, is a quick work up on how I go about making the textures I use in my skins. What sort of steps I would take to achieve the desired look I'm going after. Right now there isn't much to this. I don't really go into any details on how to use the different tools, but merely mention when I do. I'll try to expand this tutorial further into individual techniques later, but for now its just the basics.
We start off with a model that needs a texture. For the use of this tutorial, I'll use one of the current models I'm working on, the Gamorrean Guard.
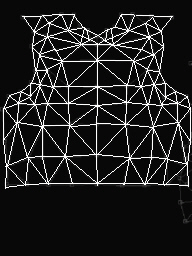 |
I've decided to start with the Gamorrean's torso.
Here you can see an image of part of his torso's UV-map. If you are starting with a model with a pre-existing skin you can just paint over the original image if you like. If creating your own image, just remember that your textures need to be the exact same size as the originals (ie, if the original is 512x512 then the new texture must be 512x512). |
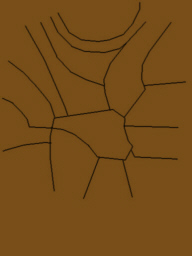 |
The shirt is a patchwork vest made of various leathers. I've
looked at various resource photos and put together a pattern similar to
that of the original costumes.
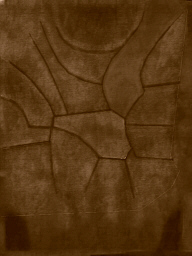
First I'll start with a solid brown color with just the basic edges of the different pieces sketched out. This way I can lay out my pattern on the model and get it to line up, without having to waste too much time going into fine details on it. Something to note is that some models are uv-mapped in a way that may distort sections of the texture. So, what may look good on the texture might not translate well to what is shown on the model. |
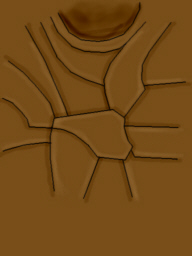 |
After you get all your basic details aligned on the model, you can
then continue working on your texture.
Here I've used my image editor's lightnes/darkness tool and followed the edges which will make up the patchwork vest. Shading the areas to give it a 3d quality, darker along the recessed side of the edges, while lighter along the opposite, so it will appear as if one piece is laying over another. Now is where your artistic sense is going to need to kick in. |
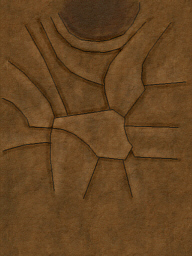 |
In order to make those basic shaded shapes look like leather, they're
going to need more detail. Rather than go in and individually hand
color each pixel, I've taken a selection of tiled textures, and have done
a few transparent fills to the entire texture (in the 85-95% range).
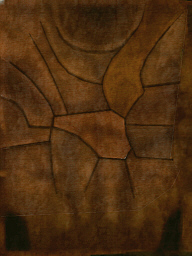
I've chosen an assortment of textures including granite, marble, tree bark, and plaster, with an emphasis on a basic leather pattern. This will give the texture a worn & dirty leather appearance which will fit the models overall look. I've also continued to lighten and darken the different areas, to enhance their 3 dimensional qualities. |
 |
After darkening the texture a bit, I've done a few more passes with
some texture fills, and a bit more shading. At this point the texture
looks pretty rough and dirty, so I'm most likely done with the fill tool.
Using the shading I've begun to imply some basics wrinkles in the vest
not much at this point, but I'll pick it up later.
Now let's add a little more color to it,... |
 |
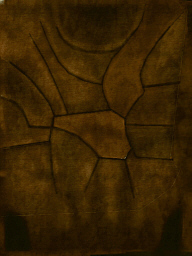
Using the editor's hue and saturation filters, I've recolored the different sections of the vest to emphasize the patchwork quality of the leather. By masking off the separate areas, and then applying the different filters, I came up with 5 variations on the original color in a seemingly random pattern. |
 |
I've gone through and darkened the texture once again, while adding
to the shaded areas to give them a recessed look. I also took the
time to add one final fill over it to blend the different colored sections
together a bit.
The texture still looks rather flat on the model though, so now it's time to take this thing and really put some detail in it. |
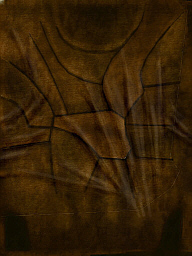 |
I've simulated some deep wrinkles in the leather by drawing transparent lines in a pattern that I had decided on. Using white and beige fro the highlights, and black and dark brown for the shadows. I use very transparent lines usually around 80% or above while doing this, and I end up going over each line multiple times. This is done so the colors will blend in more. Afterwards I once again took out the lightness/darkness tool and touched up the wrinkles where the different leathers edges meet. |
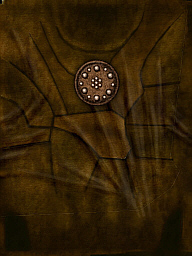 |
From another image I was working with, I cut and pasted the round emblem found on the Gamorrean Guards' chest. Since the color doesn't match up with the rest of the vest, before I combine the new addition I'll alter its hue, saturation, brightness, and contrast. |
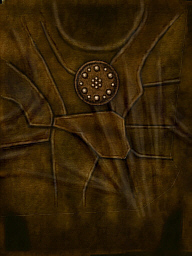 |
After matching up the emblem and combining it with the image, I went
through one last time with the lightness/darkness tool. Highlighting the
very edge of each leather piece, and then adding a slight dark edge behind,
I've implied a stitched seam line to the edge of the leather patches.
And there we have the finished texture. I know of a lot of people who would have simply stopped after step 4. But, by going all out, you can really create something memorable. |