 |
 |
|
|
|
|
|
Creating A Skin
By HapSlash
For those just starting out, here are a few descriptions of the different types of files related to creating a working skin for JKII:JO. These are only the files used to affect the way the textures look an a specific model.
JPG's, TGA's, & PNG's
Jedi Knight accepts several different types of image files, each with their own unique abilities.
JPG's
Jpg's, more or less, are your standard compressed image file. Most textures will be created with jpg's for their low file size due to their compressed nature.
TGA's
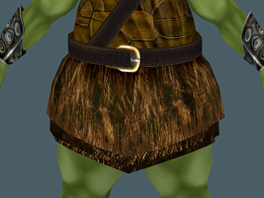
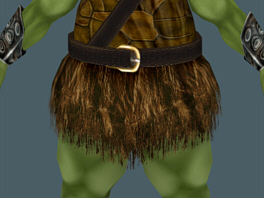
Tga's offer the option of saving a mask to the file which allows for parts of the texture to be altered by a shader effect, while leaving the rest of it untouched. Just to give you an idea on how it works here's one example of a shader effect on a tga, which I'm currently using for my Gamorrean model.
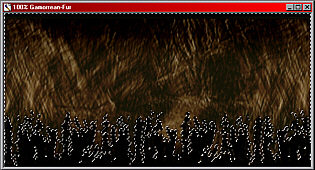
Intending to make the Gamorrean's skirt appear to be fade of fur, I've marked off a rough pattern on one end of the texture with a slightly feathered mask. When applied to the model, with the correct transparency shader attached, the area I've masked off will become transparent leaving the appearance of a rough edge to the model.
 |
 |
PNG's
Jedi Academy uses png's to create their color shading on the various player characters. I have yet to look in to how the png's work, so your guess is as good as mine,...
Skin Files
The skin files are document files that the game will call on to determine which texture belongs to which model part. There are generally three different skin files used in JO, the model_default, model_red, and model_blue. in order for the game (and modview) to recognize the .skin file it must begin with the model_ prefix. These skins also correspond to a similarly named icon in the folder which makes them selectable in MP.The skin files themselves are lists of the parts that make up the model, They are simply arranged with the name of the model part followed by the pathway, from the base folder, to the specified file which contains the texture for that part. For skinning purposes all you really need to do is rename these pathways so they correspond to the desired file.
torso_shoulder_pad,models/players/kyle_sjg/kyle_extras.tga
If the pathway is incorrect or left blank, no texture will be placed on the model part and it will be transparent in the game (or white in modview). Some people have used this method in the past to remove unwanted parts of models (such as kyle's shoulder pad). However, there are a few drawbacks to doing this. While the model parts are transparent, they are still being created by the game engine, so when shader effects are generated on the model (for example, the disintegration effect) these parts become visible for the duration of the effect.
To solve that particular problem we use the surf files,...
Skin files and Jedi Academy
JA has now incorporated it's surf files into it's skin files. Now when the pathway name is replaced with *off, the model part will not be drawn in game, the same way the surf files worked for JO.torso_shoulder_pad,*off
Surf Files
When there's a part you want removed from a model or perhaps turned back on ( like the Jedi's alternate head) that's when you use the surf files. The surf file to replace the jedi's head would look exactly like this,...surfOff "head head_face"
surfOn "head_off head_face_off"There really isn't a lot to a surf file. The model parts are entered into the quotation marks, and each individual part is separated by a space.
Surf files need to be created for each skin file you have, unless you want them to reset to their default setup, and are named with the same convention. Therefore the model_default.surf file will affect the model_default.skin file.
Surf files and Jedi Academy
JA has now incorporated it's surf files into it's skin files. Now when the pathway name is replaced with *off, the model part will not be drawn in game, the same way the surf files worked for JO.torso_shoulder_pad,*off
Creating a Texture
Now that we know all the parts needed to create the skin, Here's a simple walkthrough of how I go about creating a texture. It's not a step by step tutorial on how to run your image editor, just a short summary on how I work on a texture.Click here for
Creating a Texture
Thats all for now,
If you have
any questions about this tutorial,
additions you think should be made,
or comments about me personally,
just let me know,